

Adding Nested Columns with Confidence in BigQuery
A Step-by-Step Guide to Safely Expanding Your BigQuery Tables


Adding a column to a table in SQL is normally your bread and butter sort of stuff — normally being the key word here.
In most cases out in the wild, it’s open and close for your traditional table. Yes, things could get tricky if you’re talking about a massive table with billions of rows and locking up the table is not an option, but in most cases, it’s pretty straightforward, but you should still have your wits about you, and you should always plan and test. Doing so means things normally go alright — again, normally being the key word here.
A fun addition to adding columns to a table in BigQuery is when you have to add a nested column to a RECORD column. It’s an interesting thing to do and one I wanted to write up about for my own understanding and for those out there, learning or messing around for fun.
Setting the Scene.
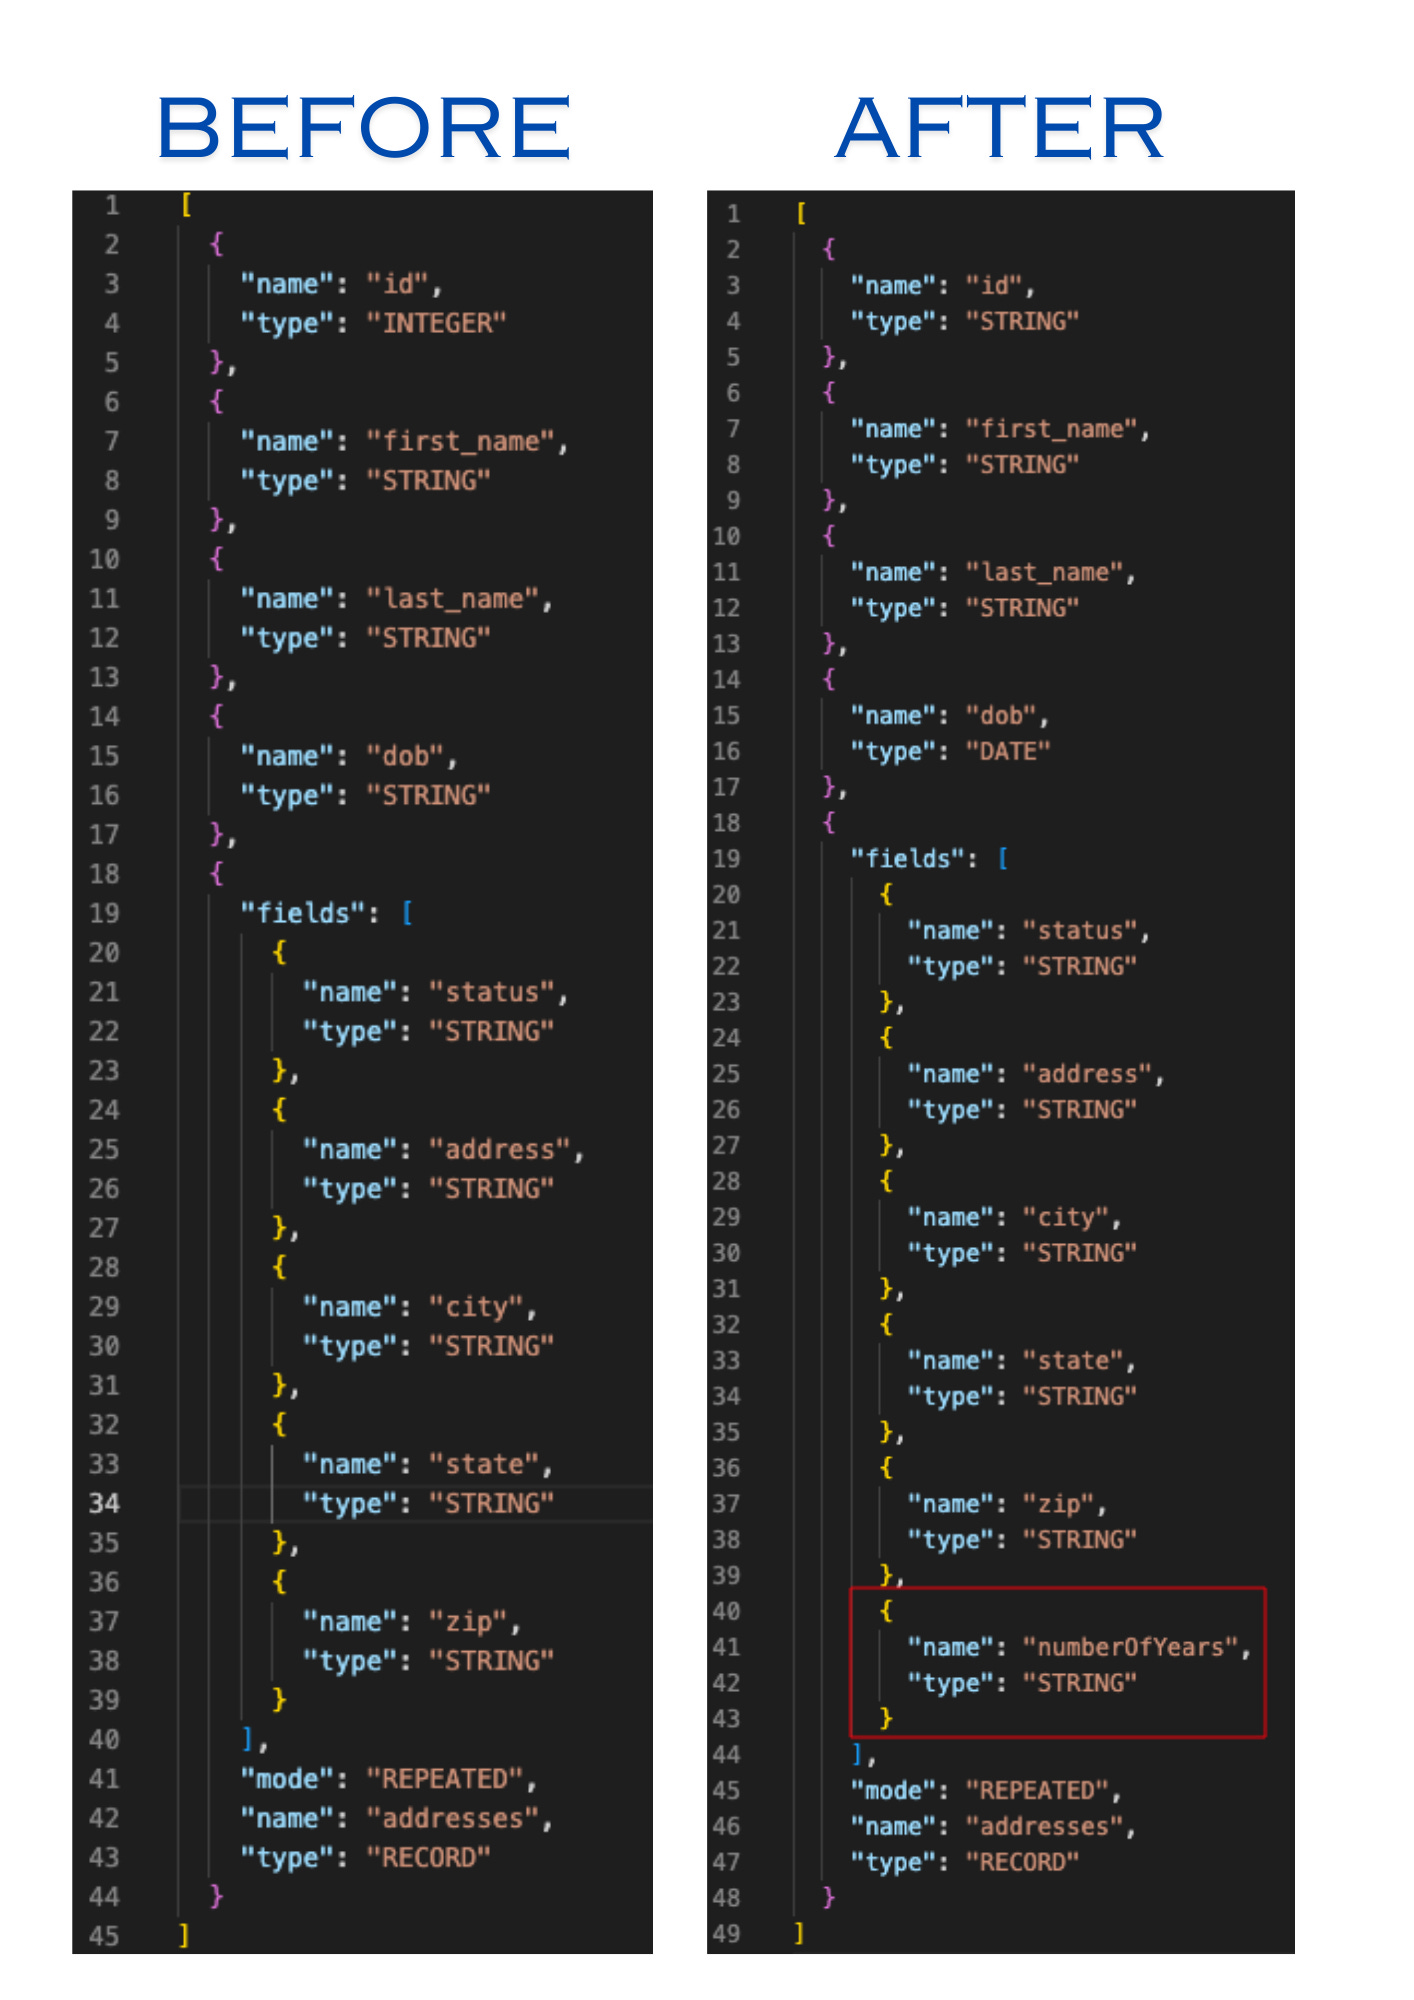
What do I want to do? I want to add a new column called numberOfYears to the addresses nested column in a table called people_info. Here is an example of the table schema. The nested addresses column is highlighted.

A quick look at the contents of the table. A little nod to all your Game of Thrones fans out there.

Right, let’s add the the new column.
We have two options:
Option One (The Long Way):
We create a dummy table (a blank one), fiddle around with adding the new column, and make sure it’s just the way we want it.
We then use the bq show command to steal the new schema layout in JSON format.
We then apply the new schema to the original table.
This way is longer because we are creating a dummy table and messing around with that. It’s probably a safer way to go, it’s super cautious, and may well be the way to go if you have a table with tons of data in it. You want to make sure you test and get things right.
Option Two (The Short Way):
Grab the table schema from our table using the bq show command.
Spit out the schema info in JSON format.
Update the JSON with the new column info.
Apply the updated schema to our table.
I’m going with Option Two for this article, but once you go through it, you will get the gist of it, and you could have a go at Option One yourself.
Step 1
You will be running some gcloud commands, so make sure you’ve got that set up and you are working in the correct project using the correct credentials, that sort of thing.
More on this here, or your uncle google will help you.
Step 2
Run the following command:
bq show --schema --format=prettyjson testing-project:demo_tim.people_info > schemafile_orig.jsonWhat does all the above mean?
bq show: This shows information about a BigQuery resources. In this case, it's being used to show information about our table people_info.--schema: This option specifies that we only want the schema of the table.--format=prettyjson: This option specifies the output format of our result.prettyjsonmeans the output will be in JSON format with indentation and line breaks to make it more readable. In other words not a mess.testing:demo_tim.people_info: This is the identifier for our table whose we want to view. In this case the project ID (testing-project), the dataset ID (demo_tim), and the table name (people_info).> schemafile_orig.json: This part of the command redirects the output of thebq showcommand to a file namedschemafile_orig.json. Instead of displaying the schema in the terminal, it saves it to this file.
Once you have run the above you will now have a nice pretty JSON file with your table schema details.
Step 3
Edit the schemafile_orig.json file with the details of the new column we want to add. In this case, I want to add a column to the nested record called numberOfYears.
It’s probably a good idea at this point to make a new file called schemafile_new.json with the changes added. You know, to keep schemafile_orig.json just in case something bad happens, something to refer back to.
Step 4
Time to apply the updated schema to our table. To do that, we run the following command.
bq update testing-project:demo_tim.people_info schemafile_new.jsonbq update: The command is used to update our table.testing-project:demo_tim.people_info: Take a guess what this is?schemafile_new.json: Our updated JSON file to define our new schema.
Once you run the above you should get a nice little message that says:
Table demo_tim.people_info successfully updated.

Let’s take a peek at the table schema and the tables data.
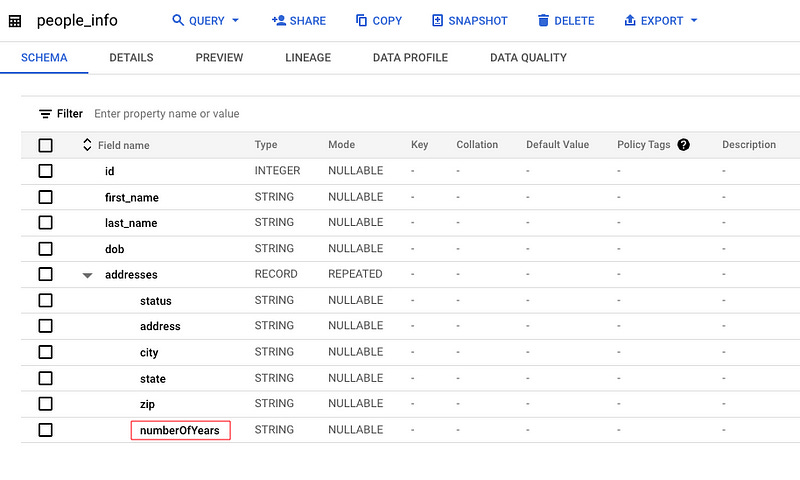
There you have it, our new column has been added and ready to backfill and or populate.

Step Up Code
If you want to have a go with this, here are the setup scripts to get the table created and load it with some dummy data.
Step Up Code
If you want to have a go with this, here are the setup scripts to get the table created and load it with some dummy data.
-- Table creation
CREATE OR REPLACE TABLE dataset.people_info (
  id INT64,
  first_name STRING,
  last_name STRING,
  dob STRING,
  addresses
    ARRAY<
      STRUCT<
        status STRING,
        address STRING,
        city STRING,
        state STRING,
        zip STRING>>
) OPTIONS (
    description = 'Table with people stuff');

-- Dummy data
INSERT INTO dataset.people_info (
    id,
    first_name,
    last_name,
    dob,
    addresses
) VALUES
    (1, "Jon", "Snow", "283-12-01", [("current", "Castle Black", "The Wall", "North", "11111")]),
    (2, "Daenerys", "Targaryen", "284-11-03", [("current", "Dragonstone", "Crownlands", "Westeros", "22222")]),
    (3, "Tyrion", "Lannister", "273-01-12", [("current", "Red Keep", "King''s Landing", "Crownlands", "33333")]),
    (4, "Arya", "Stark", "289-05-29", [("current", "Winterfell", "North", "Westeros", "44444")]),
    (5, "Cersei", "Lannister", "266-11-30", [("current", "Red Keep", "King''s Landing", "Crownlands", "55555")]),
    (6, "Jaime", "Lannister", "266-11-30", [("current", "Red Keep", "King''s Landing", "Crownlands", "66666")]),
    (7, "Sansa", "Stark", "286-02-15", [("current", "Winterfell", "North", "Westeros", "77777")]),
    (8, "Bran", "Stark", "290-12-02", [("current", "Winterfell", "North", "Westeros", "88888")]),
    (9, "Khal", "Drogo", "UNKNOWN", [("current", "Dothraki Sea", "Essos", "Essos", "99999")]),
    (10, "Petyr", "Baelish", "268-05-29", [("current", "The Vale", "Vale of Arryn", "Westeros", "101010")]);
As always, I encourage you to check out the excellent Google Cloud Documentation, which would explain things far better than me.
Thanks for reading! I send this email out twice a week. If you would like to receive it, join your fellow data peeps and subscribe below to get my latest articles.
👉 If you enjoy reading this post, feel free to share it! Or feel free to click the ❤️ button on this post so more people can discover it on Substack 🙏
🚀 Want to get in touch? feel free to find me on LinkedIn.
🎯 Want to read more of my articles, find me on Medium.
✍🏼 Write Content for Art of Data Engineering Publication.